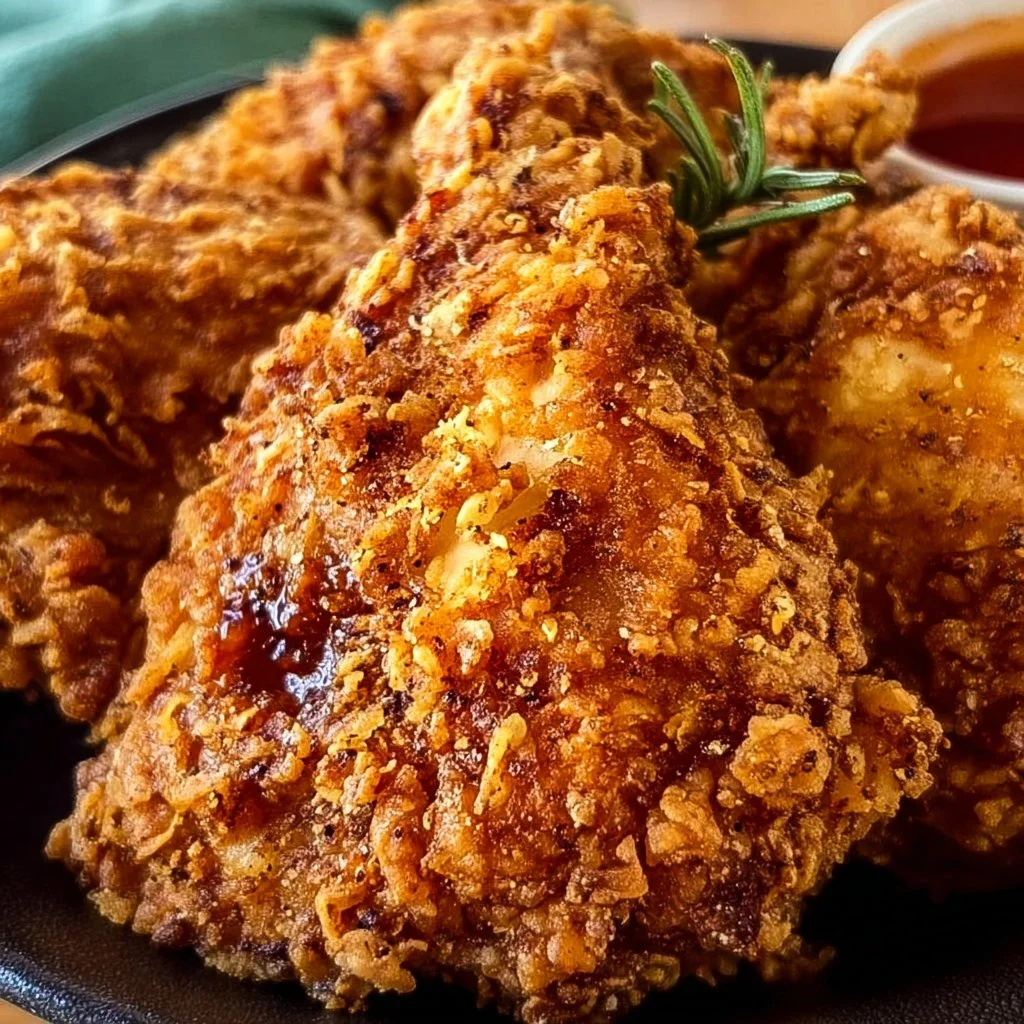
Better Than Takeout Crispy Fried Chicken
Ever bitten into a piece of chicken that was so crispy and flavorful, it made you question every takeout order you’ve ever placed?
You know the feeling—perfectly seasoned, tender on the inside, and that satisfying crunch that leaves you wanting more. This Better Than Takeout Crispy Fried Chicken recipe is your golden ticket to replicating that restaurant magic right in your kitchen. It’s quick, it’s delicious, and guess what? No need to brave the traffic for some takeout!
Why Make This Recipe
First off, let’s talk about the easy cleanup. Who wants to spend hours scrubbing pots and pans? Not me! With this recipe, you’ll whip up a delicious meal and still have energy for your favorite TV show. Plus, it’s family-friendly—kids and adults alike will gobble it up! 🙌 Finally, it’s incredibly affordable to make at home, which means more money in your pocket for those irresistible late-night snacks (or ice cream, no judgment here!).
Ingredients
You don’t need fancy stuff — just these basics!
- 8 Boneless, Skinless Chicken Thighs
- 2 Cups of Flour
- 1 Cup of Argo® Corn Starch
- 1 Tablespoon of Chili Powder
- 1 Tablespoon of Garlic Salt
- 1 Tablespoon of Onion Powder
- 1 Tablespoon of Dried Dill
- 2 Teaspoons of Dried Ginger
- 2 Teaspoons of Dry Mustard
- 1 Teaspoon of Black Pepper
- 1 Teaspoon of Nutmeg
- 2 Cups of Greek Yogurt
- 1 Tablespoon of Lemon Juice
- 1/2 Cup of Water
- About 4 to 6 Cups of Vegetable Oil for frying
- 3/4 Cup of Soy Sauce
- 1/4 Cup of Brown Sugar
- 1 Tablespoon of Argo® Corn Starch
- 4 Tablespoons of Cold Water
Directions
-
Mix the Marinade: In a large bowl, combine 2 cups of Greek yogurt, 1 tablespoon of lemon juice, and 1/2 cup of water. Place the chicken thighs in the bowl, ensuring they’re fully submerged. Marinate for at least 30 minutes.
-
Prepare the Coating: In a large shallow dish, mix the dry coating ingredients: 2 cups flour, 1 cup cornstarch, chili powder, garlic salt, onion powder, dried dill, dried ginger, dry mustard, black pepper, and nutmeg until well combined.
-
Coat the Chicken: Remove the chicken thighs from the marinade and let excess drip off. Dredge each piece thoroughly in the flour mixture, pressing firmly to ensure the coating sticks.
-
Heat the Oil: In a deep frying pan or Dutch oven, heat 4-6 cups of vegetable oil to 350°F (175°C).
-
Fry the Chicken: Carefully lower 3-4 chicken pieces into the hot oil. Fry for 6-7 minutes per side until they’re deeply golden brown and crispy.
-
Make the Glaze: While the chicken fries, whisk together soy sauce and brown sugar in a small saucepan over medium heat.
-
Brush the Glaze: Transfer the fried chicken to a wire rack set over a baking sheet. Brush each piece generously with the warm soy glaze.
-
Serve and Enjoy: Serve immediately for maximum crunch or keep warm in a 200°F oven for up to 30 minutes.
How to Make Better Than Takeout Crispy Fried Chicken (Overview)
Creating this crispy fried chicken is as easy as 1-2-3 (well, 8 steps, but who’s counting?). Start by marinating those juicy chicken thighs. This step is crucial; it locks in moisture and flavor. Then, mix your dry ingredients for that amazing coating, coating each thigh like it’s the last piece of chicken on Earth. Finally, fry until golden brown, brush with that savory glaze, and watch everyone dive in! Pro tip: let the oil heat before frying to keep your chicken crispy and not greasy! 😉
How to Serve Better Than Takeout Crispy Fried Chicken
Serve your crispy masterpiece on a colorful platter alongside some crispy fries, a fresh salad, or maybe even some buttery corn on the cob. Picture this: bright golden pieces of chicken, the aroma wafting through your kitchen, the contrast of crunchy skin against the tender meat. Who wouldn’t want to dive into that deliciousness? Drizzle more glaze over the top to take it to the next level—your taste buds will thank you!
How to Store Better Than Takeout Crispy Fried Chicken
When it comes to storage, you can keep leftovers in the fridge for up to 3-4 days. If you want to keep the crunch factor, store them in an airtight container lined with paper towels to absorb excess moisture. For longer storage, freeze them for up to 3 months. Just be sure to reheat in the oven to regain that crispy texture. Nobody likes soggy chicken! 😉
Tips to Make Better Than Takeout Crispy Fried Chicken
- Double-dip for extra crunch: After the first coating, dip the chicken back into the marinade then into the dry mix again.
- Use cold water to keep your batter light and airy. Warm water makes it dense—no one wants that!
- Adjust seasoning! Love spice? Add cayenne for a kick. Not a fan of something? Just leave it out!
- Let your oil come back up to temp between batches; this ensures consistent cooking!
- If you’re feeling fancy, toss in some herbs into the flour mix for extra flavor.
Variation
Want to add a twist? Try replacing the chicken thighs with tofu for a vegan option—just make sure to press it well to remove excess moisture before marinating! Or, switch up the spices based on your taste—maybe go for a smoky BBQ rub instead. The world (and your taste buds) is your oyster!
FAQs
1. Can I use chicken breast instead of thighs?
Absolutely! Just keep an eye on the cooking time since breasts may cook faster.
2. Can I marinate the chicken overnight?
Yes! Marinating overnight can enhance the flavor even more; just make sure to keep it in the fridge.
3. How can I make this gluten-free?
Simply swap the flour and cornstarch with your favorite gluten-free options—like almond flour or a gluten-free blend!
📌 Pin this recipe for your next cozy dinner night!

Crispy Fried Chicken
Ingredients
Method
- In a large bowl, combine Greek yogurt, lemon juice, and water. Place the chicken thighs in the bowl, ensuring they’re fully submerged. Marinate for at least 30 minutes.
- In a large shallow dish, mix the flour, corn starch, chili powder, garlic salt, onion powder, dried dill, dried ginger, dry mustard, black pepper, and nutmeg until well combined.
- Remove the chicken thighs from the marinade and let excess drip off. Dredge each piece thoroughly in the flour mixture, pressing firmly to ensure the coating sticks.
- In a deep frying pan or Dutch oven, heat vegetable oil to 350°F (175°C).
- Carefully lower 3-4 chicken pieces into the hot oil. Fry for 6-7 minutes per side until they’re deeply golden brown and crispy.
- While the chicken fries, whisk together soy sauce and brown sugar in a small saucepan over medium heat.
- Transfer the fried chicken to a wire rack set over a baking sheet. Brush each piece generously with the warm soy glaze.
- Serve immediately for maximum crunch or keep warm in a 200°F oven for up to 30 minutes.